How To Install Front and/or Rear Sprocket. BanditLife.

BanditGville

New member
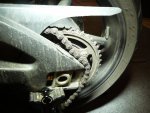
Alright busy night. Got my sprockets in today. I personally went -1 front (15T) and +1 Rear (47T) 525 pitch Stock chain length worked perfect. I am super happy with how she rides. Here is another nice "How To". I do not go over the rear wheel removal for the most part, since it is really really easy. I figure people doing this at home are pretty mechanically minded folks. These are the highlights and tips *I used*. I tried several ways before i took each photo. ENJOY!!

1.JPG
Lift your motorcycle. I am using spools i picked up tonight from Cyclegear. (Couldn't 'safely' carry the stand on my motorcycle-so floor jacks tonight!)
2.JPG
Locate and loosen the binder bolt for the shift linkage 8mm.
*Mark the alignment* I just drew a little 'dot' where the opening was. Look close you can see it.
3.JPG
***REMOVE the entire bolt!***
4.JPG
Pull the linkage off. Its a bit tight but it works.
bolts.jpg
*UPTADED* Remove these two bolts and slide the shift linkage out of the frame, towards rear wheel.
5A.JPG
Un-clip the wires from this hold down.
6.JPG
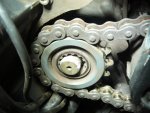
Use your 5mm with an extension to remove the three(3) screws on cover. Remove cover.
7.JPG
Your front sprocket will have a 30mm nut on it,,, here is how to remove it without an impact gun.
7a.JPG
Sit on top of your bike, and place your heel on the brake lever.
7b.JPG
Use a breaker bar inside your left foot to loosen the nut. mine was TIGHT!! Be prepared.
 

Attachments

  • 4b.JPG
    4b.JPG
    93.2 KB · Views: 134
  • 8.JPG
    8.JPG
    93.5 KB · Views: 145
  • 9.JPG
    9.JPG
    89.8 KB · Views: 121
Last edited:

BanditGville

New member
Ignore the thumbnails above, could not figure out how to remove them...

8.JPG
Once the nut is removed, slide the rear wheel forward...
*If like me, you left your bike in gear :cuss: You can still remove the chain by doing this...
Slide the sprocket off the input shaft.
9.JPG
Spin rear wheel now and remove chain.
10.JPG
Push extra chain forward to give you room to actually remove the sprocket. (or make sure you bike is in neutral)
11.JPG
Install the sexyness that is your new sprocket!!!

Re install chain, nut, plastic cover, Ect. Torque for the nut is *61 ft/lbs*.
STOCK CHAIN LENGTH WILL WORK HERE. I tried it to answer that question for you. I use thread lock on the bolt for the plastic cover. "Snug" these up again with you 5mm.

If your also doing rear sprocket, lets continue our journey.....

12.JPG
Remove axel nut + axel. To get the wheel off and brake out. Push the wheel up, I use my foot under the tire, and the whole brake assembly can now be slide outwards. You dont have to unbolt it.
13.JPG
Alright now these puppies were REALLY tight. I used a mallet and a 17mm wrench to break them loose.
14.JPG
Torque to *58 ft/lbs*

Ok, reinstall the wheel, You will use a 32mm socket. Torque is *108 ft/lbs*. Adjust your chain so it only has about 1" of vertical play.....

AND....

P1010776.JPG
Lube your chain.... because you know it needs it! :tup:

Lastly here is a snap shot of ALL tools you will need
aa.JPG
1/2" torque wrench, 1/2" breaker bar, 3/8" ratchet, 30mm + 32mm Socket, 1/2" drive 17mm socket, 3/8" drive 5mm, 3/8" extension, 17mm wrench, (2) 12mm wrenchs (adjusters for chain tension), 10mm wrench (lock nut on shifter rod), 8mm wrench (Binder bolt-shift linkage), Thread lock (blue), A Marker (mark location of shifter clamp on input shaft).
 
Last edited:

9 Lives

New member
Just a few things to add, before you remove the front sprocket nut take a small punch and bend back the peened over part of the nut, this locks the nut in place so if you bend it back the nut will come off a lot easier. There is also a possibility of damaging the treads on the shaft if you don't. If you damage the treads it will be a RPITA to fix and if you have to replace that shaft its big $$$$. This nut should be replaced every time you remove it, small price to pay for the piece of mind IMO. Make sure you peen the shoulder of the new nut after its torqued. There are 2 small cut outs 180 degrees apart on the shaft, peen at least one of them but I did both. I also put a dab of blue lock tight on it also but not required.

Its easier to remove your shift linkage by pulling back the rubber boot on the shift lever, there is a bolt that bolts on the ball on the shift lever. If you remove the complete foot peg the whole assemble will slide out of the frame fairly easily. That way you don't have to worry about adjusting your shift linkage, or marking the shift lever.

Some front sprockets have an outside and inside, you can install them backwards. Look for an arrow or some other marking to see which side goes out, if there is no marking it can go on either way.

This is the small cut out on the end of the shaft

20140917_155349_resized.jpg

With the new nut on and peened

20140917_155941_resized.jpg

This is the bolt behind the rubber boot

DSC02730.jpg

Remove these 2 bolts, leave the rod attached and the whole thing will come out as an assembly

DSC02731.jpg
 
Last edited:

BanditGville

New member
Just a few things to add, before you remove the front sprocket nut take a small punch and bend back the peened over part of the nut, this locks the nut in place so if you bend it back the nut will come off a lot easier. There is also a possibility of damaging the treads on the shaft if you don't. If you damage the treads it will be a RPITA to fix and if you have to replace that shaft its big $$$$. This nut should be replaced every time you remove it, small price to pay for the piece of mind IMO. Make sure you peen the shoulder of the new nut after its torqued. There are 2 small cut outs 180 degrees apart on the shaft, peen at least one of them but I did both. I also put a dab of blue lock tight on it also but not required.

Its easier to remove your shift linkage by pulling back the rubber boot on the shift lever, there is a bolt that bolts on the ball on the shift lever. If you remove the complete foot peg the whole assemble will slide out of the frame fairly easily. That way you don't have to worry about adjusting your shift linkage, or marking the shift lever.

Some front sprockets have an outside and inside, you can install them backwards. Look for an arrow or some other marking to see which side goes out, if there is no marking it can go on either way.

This is the small cut out on the end of the shaft

View attachment 5403

With the new nut on and peened

View attachment 5404

This is the bolt behind the rubber boot

View attachment 5405

Remove these 2 bolts, leave the rod attached and the whole thing will come out as an assembly

View attachment 5406

Nice add ons, my bolt didn't have the sholders, or a cut out in the input shaft. It did have red locktite on the end. it was really thick and it was tight going back one i added some blue for good measure. It basically looked like a smalled rear axel nut. My FZ8 is a 2012 so maybe difference in years?

As for the rod removal, I love your technique wish i had thought of that :nw:
 

9 Lives

New member
Nice add ons, my bolt didn't have the sholders, or a cut out in the input shaft. It did have red locktite on the end. it was really thick and it was tight going back one i added some blue for good measure. It basically looked like a smalled rear axel nut. My FZ8 is a 2012 so maybe difference in years?

As for the rod removal, I love your technique wish i had thought of that :nw:

According to the parts fiche its the same shaft and nut for all years. No matter anyway, just watch out if you have this locking mechanism.
 

Wolf

Member
Will be attempting this in a few days. Thanks! (y)

+3 rear
 

Wolf

Member
Nothing to bend away on front sprocket, came loose easily with breaker bar.
Just need waiting on a new master link, as I pressed mine too much and had to take it off. :confused:
And apparently different chain brands use different sized pins on their links, so the master link I bought from the local shop has a pin diameter too large for the JT Sprockets chain. Waiting on a JT master link now.

 
Top